

The BMG160 is an ultra-small, digital 3-axis angular rate sensor with a measurement range up to 2000°/s and a digital resolution of 16 bit for consumer electronics applications. The BMG160 allows low-noise measurement of angular rates in 3 perpendicular axes and is designed for use in cellular phones, handhelds, computer peripherals, man-machine interfaces, virtual reality features, remote and game controllers.
With its small footprint of only 3 x 3 mm² the BMG160 is unique in the class of low-noise consumer electronics gyroscopes. The zero-rate offset and offset stability over temperature of the BMG160 are outstanding.
Applications
– Gaming
– Navigation systems
– Motion and activity measurement
– Optical image stabilization
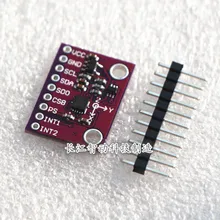
Connection
| Arduino Connection | Module Connection |
| 5v | Vcc |
| Gnd | Gnd |
| SDA | SDA |
| SCL | SCL |
Code
Not my original code but the I2C address had to be changed for my module
[codesyntax lang=”cpp”]
// Distributed with a free-will license.
// Use it any way you want, profit or free, provided it fits in the licenses of its associated works.
// BMG160
// This code is designed to work with the BMG160_I2CS I2C Mini Module available from ControlEverything.com.
// https://www.controleverything.com/content/Gyro?sku=BMG160_I2CS#tabs-0-product_tabset-2

#include<Wire.h>

// BMG160 I2C address is 0x68(104)
#define Addr 0x69 //my module was 0x69, some are 0x68

void setup()
{
  // Initialise I2C communication as MASTER
  Wire.begin();
  // Initialise Serial Communication, set baud rate = 9600
  Serial.begin(9600);

  // Start I2C Transmission
  Wire.beginTransmission(Addr);
  // Select Range register
  Wire.write(0x0F);
  // Configure full scale range 2000 dps
  Wire.write(0x80);
  // Stop I2C Transmission
  Wire.endTransmission();

  // Start I2C Transmission
  Wire.beginTransmission(Addr);
  // Select Bandwidth register
  Wire.write(0x10);
  // Set bandwidth = 200 Hz
  Wire.write(0x04);
  // Stop I2C Transmission
  Wire.endTransmission();
  delay(300);
}

void loop()
{
  unsigned int data[6];
  // Start I2C Transmission
  Wire.beginTransmission(Addr);
  // Select Gyrometer data register
  Wire.write(0x02);
  // Stop I2C Transmission
  Wire.endTransmission();

  // Request 6 bytes of data
  Wire.requestFrom(Addr, 6);
  // Read 6 bytes of data
  // xGyro lsb, xGyro msb, yGyro lsb, yGyro msb, zGyro lsb, zGyro msb
  if(Wire.available() == 6)
  {
    data[0] = Wire.read();
    data[1] = Wire.read();
    data[2] = Wire.read();
    data[3] = Wire.read();
    data[4] = Wire.read();
    data[5] = Wire.read();
  }
  delay(300);

  // Convert the data
  int xGyro = ((data[1] * 256) + data[0]);
  int yGyro = ((data[3] * 256) + data[2]);
  int zGyro = ((data[5] * 256) + data[4]);

  // Output data to the serial monitor
  Serial.print("X-Axis of Rotation:  ");
  Serial.println(xGyro);
  Serial.print("Y-Axis of Rotation:  ");
  Serial.println(yGyro);
  Serial.print("Z-Axis of Rotation:  ");
  Serial.println(zGyro);
  delay(500);
}
[/codesyntax]
Output
Open the serial monitor and you should see something like the following
X-Axis of Rotation: 0
Y-Axis of Rotation: 1
Z-Axis of Rotation: 1
X-Axis of Rotation: 18
Y-Axis of Rotation: 263
Z-Axis of Rotation: -682
X-Axis of Rotation: -2628
Y-Axis of Rotation: -817
Z-Axis of Rotation: 495
X-Axis of Rotation: -25
Y-Axis of Rotation: -3261
Z-Axis of Rotation: 6151
X-Axis of Rotation: -5710
Y-Axis of Rotation: 276
Z-Axis of Rotation: -704
X-Axis of Rotation: 3174
Y-Axis of Rotation: 338
Z-Axis of Rotation: 5246
X-Axis of Rotation: -2235
Y-Axis of Rotation: -1122
Z-Axis of Rotation: -4362
X-Axis of Rotation: 3431
Y-Axis of Rotation: -2410
Z-Axis of Rotation: 298
Link
CJMCU-160 Sensortec three axis gyro attitude sensor module BMG160