

In this example we will connect an MLX90393 magnetic field sensor to a Raspberry Pi and use Java to display the temperature readings, there are other languages such as C and python which work as well but I wanted to try something a little different
Here is a recap of the sensor
The MLX90393 magnetic field sensor can be reprogrammed to different modes and with different settings at run-time. The sensor offers a 16-bit output proportional to the magnetic flux density sensed along the XYZ axes using the Melexis proprietary Triaxis® technology and also offers a temperature output signal. These digital values are available via I2C and SPI, where the MLX90393 is a slave on the bus.
By selecting which axes are to be measured, the raw data can be used as input for further post-processing, such as for joystick applications, rotary knobs, and more complex 3D position sensing applications. Unparallelled performance is achieved with this sensor, which is primarily targeting industrial and consumer applications.
more info – https://www.melexis.com/en/product/MLX90393/Triaxis-Micropower-Magnetometer
Layout
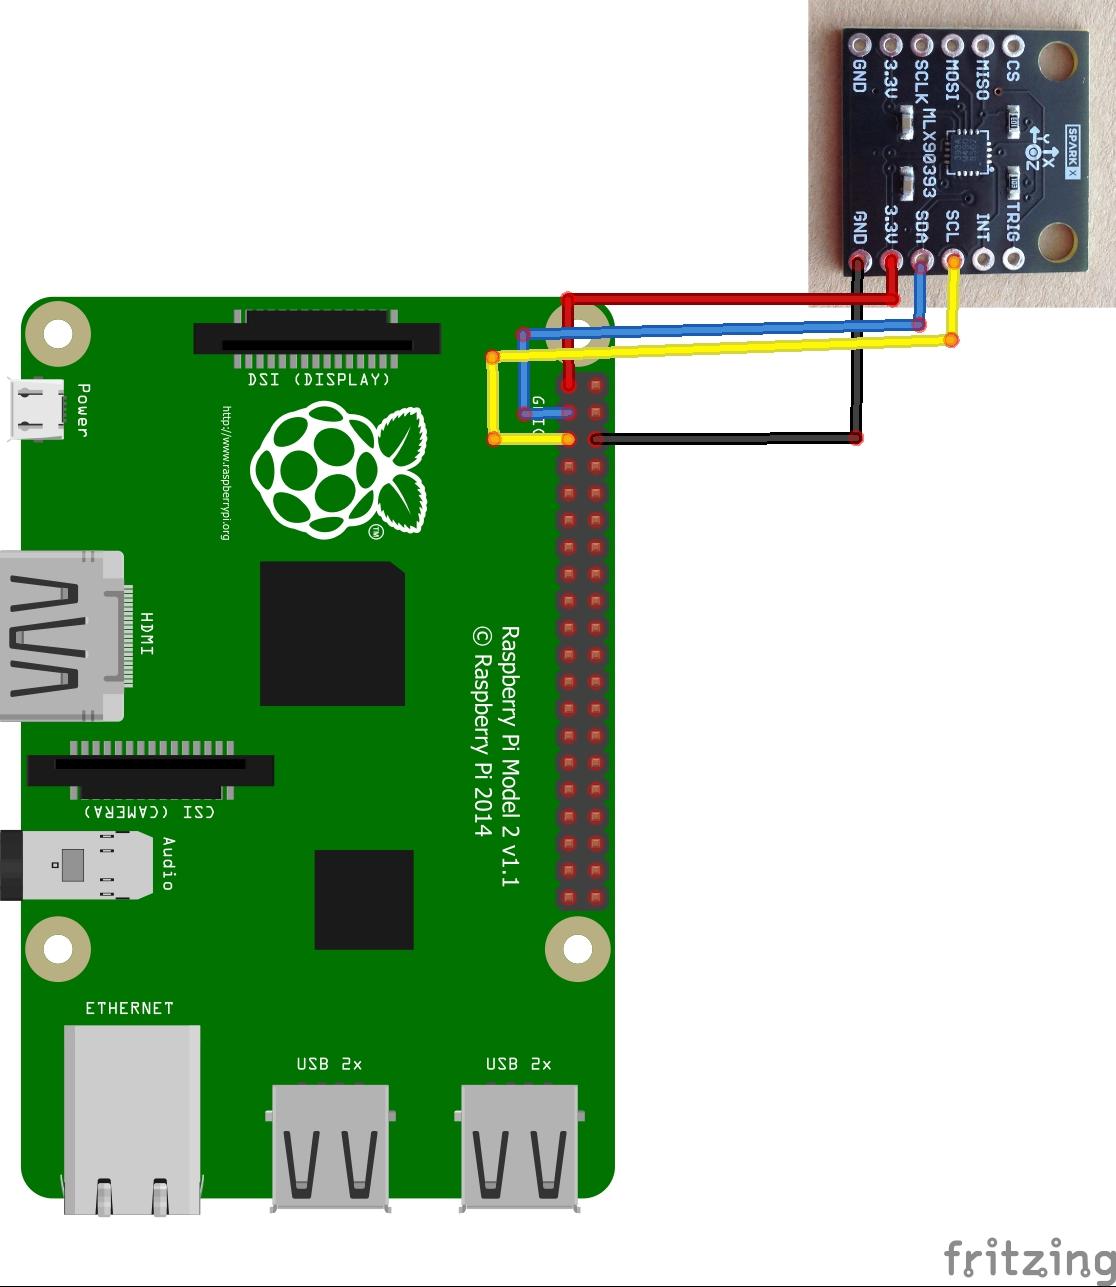
pi and mlx90393
Code
This time we explore the world of Java on the Raspberry Pi
First you need to install PI4j – http://pi4j.com/install.html . I’ll sum it up as its easy to install from a terminal
The simplest method to install Pi4J on your RaspberryPi is to execute the following command directly on your RaspberryPi.
curl -s get.pi4j.com | sudo bash
Now for the java code – this is courtesy of a controleverything example
[codesyntax lang=”java”]
// Distributed with a free-will license.
// Use it any way you want, profit or free, provided it fits in the licenses of its associated works.
// MLX90393
// This code is designed to work with the MLX90393_I2CS I2C Mini Module available from ControlEverything.com.
// https://www.controleverything.com/products

import com.pi4j.io.i2c.I2CBus;
import com.pi4j.io.i2c.I2CDevice;
import com.pi4j.io.i2c.I2CFactory;
import java.io.IOException;

public class MLX90393
{
	public static void main(String args[]) throws Exception
	{
		// Create I2CBus
		I2CBus bus = I2CFactory.getInstance(I2CBus.BUS_1);
		// Get I2C device, MLX90393 I2C address is 0x0C(12)
		I2CDevice device = bus.getDevice(0x0C);

		// Write register command, AH = 0x00, AL = 0x5C, Hall plate spinning rate = DEFAULT, GAIN_SEL = 5
		// Address register, (0x00 << 2)
		byte[] config = new byte[4];
		config[0] = 0x60;
		config[1] = 0x00;
		config[2] = 0x5C;
		config[3] = 0x00;
		device.write(config, 0, 4);

		byte[] data = new byte[7];
		// Read 1 byte
		// status
		data[0] = (byte)device.read();

		// Write register command, AH = 0x02, AL = 0xB4, RES for magnetic measurement = 0
		// Address register, (0x02 << 2)
		config[0] = 0x60;
		config[1] = 0x02;
		config[2] = (byte)0xB4;
		config[3] = 0x08;
		device.write(config, 0, 4);

		// Read 1 byte
		// status
		data[0] = (byte)device.read();

		// Start single meaurement mode, X, Y, Z-Axis enabled
		device.write((byte)0x3E);

		// Read 1 byte
		// status
		data[0] = (byte)device.read();
		Thread.sleep(100);

		// Send read measurement command, X, Y, Z-Axis enabled
		device.write((byte)0x4E);

		// Read 7 bytes of data
		// status, xMag msb, xMag lsb, yMag msb, yMag lsb, zMag msb, zMag lsb
		device.read(data, 0, 7);

		// Convert the data
		int xMag = (data[1] & 0xFF) * 256 + (data[2] & 0xFF);
		if(xMag > 32767)
		{
			xMag -= 65536;
		}

		int yMag = (data[3] & 0xFF) * 256 + (data[4] & 0xFF);
		if(yMag > 32767)
		{
			yMag -= 65536;
		}

		int zMag = (data[5] & 0xFF) * 256 + (data[6] & 0xFF);
		if(zMag > 32767)
		{
			zMag -= 65536;
		}

		// Output data to screen
		System.out.printf("Magnetic Field in X-Axis : %d %n", xMag);
		System.out.printf("Magnetic Field in Y-Axis : %d %n", yMag);
		System.out.printf("Magnetic Field in Z-Axis : %d %n", zMag);
	}
}
[/codesyntax]
Now you have to compile and run the program like this
$> sudo pi4j MLX90393.java
Testing
You should see something like this
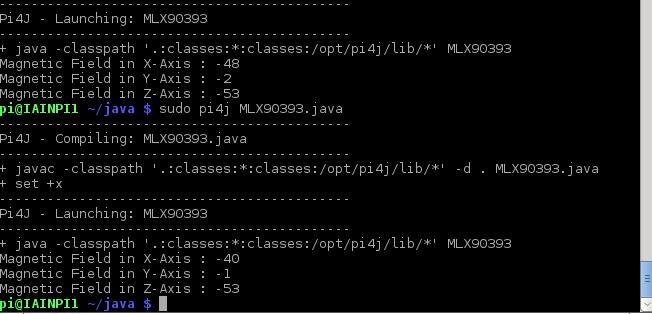
mlx90393 output
Links
MLX90393 digital 3D Holzer sensor, displacement, angle, rotation, 3D position