

Did you know that you can use the ARduino IDE with STM32 boards – this shows how to add the support
Install Arduino IDE
Download and install Arduino software (IDE) for the required OS. (Windows, Linux or Macinstructions)
Add STM32 boards support to Arduino
This is the needed step to get STM32 targets added to Arduino. So carefully follow the following steps.
Boards manager concept
Arduino.cc IDE allows to add easily new board thanks the “Boards Managers“. More information about “Boards Managers” is available on Arduino.cc official website:
Installing additional Arduino Cores
The corresponding STM32 cores packages are provided thanks to:
https://github.com/stm32duino/BoardManagerFiles
Follow the below steps to get STM32 boards installed to your Arduino IDE.
Installing STM32 Cores
1- Launch Arduino.cc IDE. Click on “File” menu and then “Preferences“.
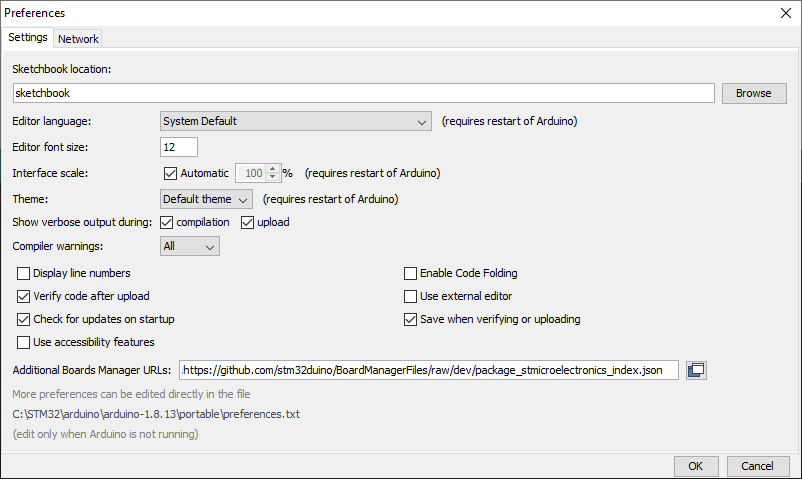
The “Preferences” dialog will open, then add the following link to the “Additional Boards Managers URLs” field:
https://github.com/stm32duino/BoardManagerFiles/raw/master/STM32/package_stm_index.json
Click “Ok”
2- Click on “Tools” menu and then “Boards > Boards Manager”

The board manager will open and you will see a list of installed and available boards.
Select “Contributed” type.

Select the “STM32 Cores” and click on install.

After installation is complete an “INSTALLED” tag appears next to the core name.
You can close the Board Manager.
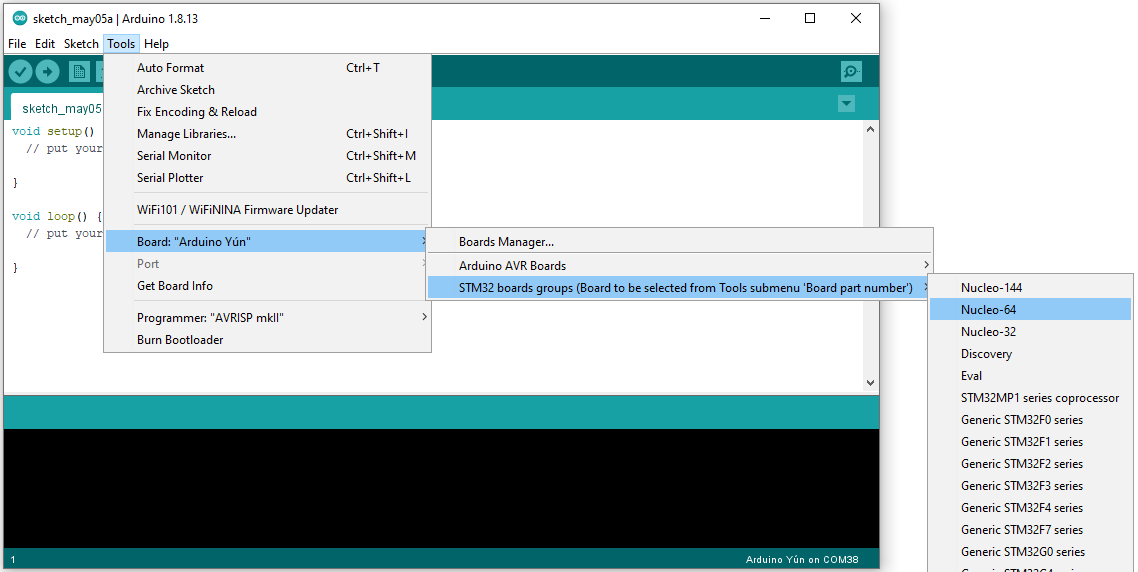
Now you can find the STM32 boards package in the “Board” menu.
Select the desired boards series: Nucleo-64 / Nucleo-144 / Discovery

Then you can find the Nucleo-64 boards available in a sub-menu of the “Tools” menu.
Troubleshooting
If you have any issue to download/use a package, you could file an issue on Github.
Or submit a topic on the stm32duino forum:
- questions on the STM32 Core
- bugs/enhancements on the STM core: Bugs and enhancements
Proxy
If you have any issue to download a package, ensure to not be behind a proxy.
Else configure the proxy in the Arduino.cc IDE (open the “Preferences” dialog and select “Network” tab).
Configuring IDE
- Connect a board to the computer USB port. For this example: Nucleo L476RG
- Launch the Arduino software

- Select the Nucleo L476RG board in two steps:
a. From the “Tools > Board” menu, select the STM32 board series: Nucleo-64

b. Then from the “Tools > Nulceo 64 boards” menu, select the Nucleo L476RG

- Select the serial port from the “Tools > Port” menu
- On Mac, it’s something like /dev/tty.usbmodem-1511.
- On Windows, it’s often the highest-numbered COM port. In this example, it’s COM5
- On Linux, it’s something like /dev/ttyACM0.
(Or unplug the board, check the menu, and then plug the board and check what new port appears)

Upload method
Depending of the board, several upload method could be proposed, thanks the “Tools > Upload Method” menu

source : https://github.com/stm32duino/wiki/wiki/Getting-Started