

In this example you will connect the Arduino Esplora to your PC and see the data via the serial monitor. In the picture below you can see the location of the accelerometer on the board
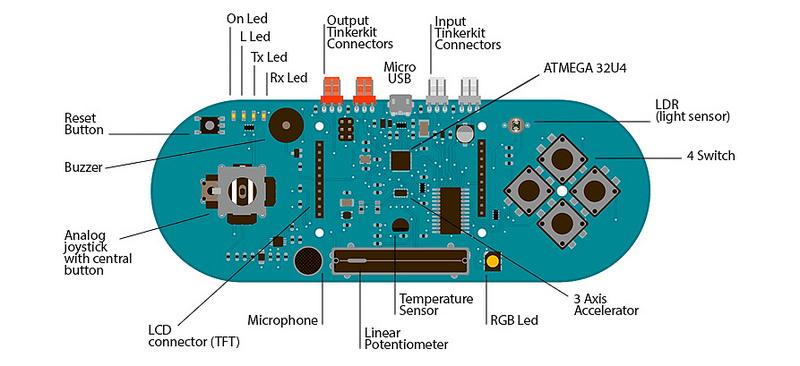
esplora
We will use the readAccelerometer function, here are more details about this.
Description
Reads values from the Esplora’s accelerometer. Each of the three axes are accessed independently.
Syntax
Esplora.readAccelerometer(axis)
Parameters
axis : char, determines what axis to read.
| X_AXIS | to read the X-axis value |
| Y_AXIS | to read the Y-axis value |
| Z_AXIS | to read the Z-axis value |
Returns
int : the value of the readings on the chosen axis. The accelerometer returns zero when it is perpendicular to the direction of gravity. Positive or negative values result when it is accelerates in one of the two directions of the axis.
Code
[codesyntax lang=”cpp”]
#include <Esplora.h>

void setup()
{
 Serial.begin(9600);
}

void loop()
{
 int x_axis = Esplora.readAccelerometer(X_AXIS);
 int y_axis = Esplora.readAccelerometer(Y_AXIS);
 int z_axis = Esplora.readAccelerometer(Z_AXIS);

 Serial.print("x: ");
 Serial.print(x_axis);
 Serial.print("\ty: ");
 Serial.print(y_axis);
 Serial.print("\tz: ");
 Serial.println(z_axis);

 delay(500);
}
[/codesyntax]
Results
You should see something like this is the serial monitor window, move your esplora and the values will change
x: 3 y: 38 z: 142
x: 0 y: 41 z: 141
x: 2 y: 46 z: 142
x: 26 y: -43 z: 110
x: 11 y: -137 z: -53
x: -18 y: -110 z: 48
x: -106 y: 128 z: -23
x: 33 y: -12 z: 137
x: 44 y: -90 z: 22
x: -15 y: 46 z: 139
x: 5 y: 27 z: 142