

In this example we show how to connect a HMC5883 Digital Compass IC to a MSP-EXP432P401R LaunchPad, the example will use the Energia IDE.
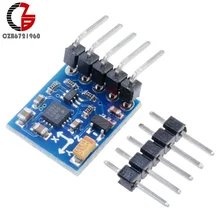
I used a HMC5883 module in this example, which you can see below
The HMC5883L-TR is a 3-axis Digital Compass IC for low-field magnetic sensing with a digital interface for applications such as low cost compassing and magnetometry. The HMC5883L includes our state-of-the art, high-resolution HMC118X series magneto-resistive sensors plus an ASIC containing amplification, automatic degaussing strap drivers, offset cancellation and a 12-bit ADC that enables 1 to 2° compass heading accuracy. The I²C serial bus allows for easy interface.
It utilizes Anisotropic Magnetoresistive (AMR) technology that provides advantages over other magnetic sensor technologies. These anisotropic, directional sensors feature precision in-axis sensitivity and linearity. These sensors’ solid-state construction with very low cross-axis sensitivity is designed to measure both the direction and the magnitude of Earth’s magnetic fields, from milli-gauss to 8 gauss.
Connection
Here is a picture of the launchpad so you can see what pins we are referring to below in the table
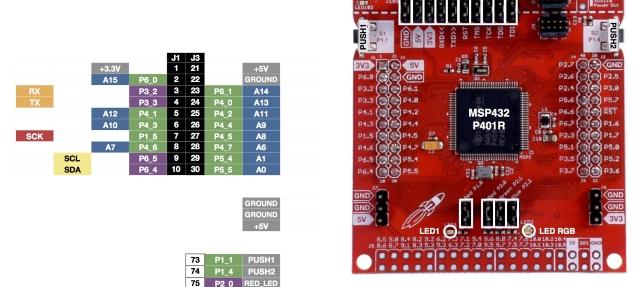
launchpad pins1
| Module Connection | MSP432 Connection |
| SDA | J1-10 SDA |
| SCL | J1-9 SCL |
| Gnd | J3-22 Gnd |
| Vcc | J1-1 3.3v |
Code
[codesyntax lang=”cpp”]
#include<Wire.h>

// HMC5883 I2C address is 0x1E(30)
#define Addr 0x1E

void setup()
{
  // Initialise I2C communication as MASTER
  Wire.begin();
  // Initialise Serial Communication, set baud rate = 9600
  Serial.begin(9600);

  // Start I2C Transmission
  Wire.beginTransmission(Addr);
  // Select configure register A
  Wire.write(0x00);
  // Set normal measurement configuration, data output rate = 0.75Hz
  Wire.write(0x60);
  // Stop I2C Transmission
  Wire.endTransmission();

  // Start I2C Transmission
  Wire.beginTransmission(Addr);
  // Select Mode register
  Wire.write(0x02);
  // Set continuous measurement
  Wire.write(0x00);
  // Stop I2C Transmission
  Wire.endTransmission();
  delay(300);
}

void loop()
{
  unsigned int data[6];
  // Start I2C Transmission
  Wire.beginTransmission(Addr);
  // Select data register
  Wire.write(0x03);
  // Stop I2C Transmission
  Wire.endTransmission();

  // Request 6 bytes of data
  Wire.requestFrom(Addr, 6);

  // Read 6 bytes of data
  // xMag msb, xMag lsb, zMag msb, zMag lsb, yMag msb, yMag lsb
  if(Wire.available() == 6)
  {
    data[0] = Wire.read();
    data[1] = Wire.read();
    data[2] = Wire.read();
    data[3] = Wire.read();
    data[4] = Wire.read();
    data[5] = Wire.read();
  }
  delay(300);

  // Convert the data
  int xMag = ((data[0] * 256) + data[1]);
  int zMag = ((data[2] * 256) + data[3]);
  int yMag = ((data[4] * 256) + data[5]);

  // Output data to serial monitor
  Serial.print("Magnetic Field in X-Axis : ");
  Serial.println(xMag);
  Serial.print("Magnetic Field in Y-Axis : ");
  Serial.println(yMag);
  Serial.print("Magnetic Field in Z-Axis : ");
  Serial.println(zMag);
  delay(300);
}
[/codesyntax]
Output
Open the serial monitor and you should see something like this
Magnetic Field in X-Axis : 65462
Magnetic Field in Y-Axis : 173
Magnetic Field in Z-Axis : 55
Magnetic Field in X-Axis : 65462
Magnetic Field in Y-Axis : 173
Magnetic Field in Z-Axis : 55
Magnetic Field in X-Axis : 65461
Magnetic Field in Y-Axis : 174
Magnetic Field in Z-Axis : 55
Magnetic Field in X-Axis : 65461
Magnetic Field in Y-Axis : 174
Magnetic Field in Z-Axis : 55
Magnetic Field in X-Axis : 65461
Magnetic Field in Y-Axis : 174
Magnetic Field in Z-Axis : 55
Magnetic Field in X-Axis : 65462
Magnetic Field in Y-Axis : 169
Magnetic Field in Z-Axis : 54
Links
HMC5883 GY-271 3V-5V Triple Axis Compass Magnetometer Sensor Module For Arduino