

In this example we show how to connect a MAG3110 3D magnetic sensor to a MSP-EXP432P401R LaunchPad, the example will use the Energia IDE.
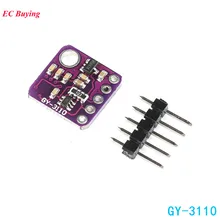
I used a MAG3110 module in this example, which you can see below
Connection
Here is a picture of the launchpad so you can see what pins we are referring to below in the table
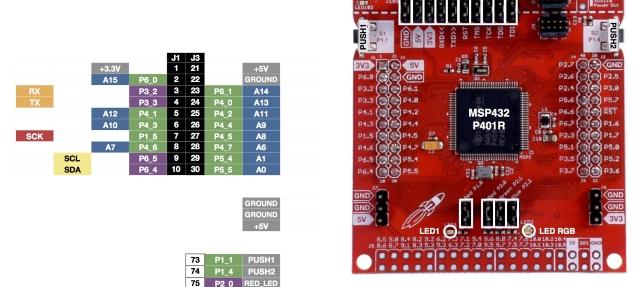
launchpad pins1
| Module Connection | MSP432 Connection |
| SDA | J1-10 SDA |
| SCL | J1-9 SCL |
| Gnd | J3-22 Gnd |
| Vcc | J1-1 3.3v |
Code
[codesyntax lang=”cpp”]
#include<Wire.h>

// MAG3110 I2C address is 0x0E(14)
#define Addr 0x0E

void setup()
{
  // Initialise I2C communication as MASTER
  Wire.begin();
  // Initialise serial communication, set baud rate = 9600
  Serial.begin(9600);

  // Start I2C Transmission
  Wire.beginTransmission(Addr);
  // Select control register-1
  Wire.write(0x10);
  // Set active mode enabled
  Wire.write(0x01);
  // Stop I2C Transmission
  Wire.endTransmission();
  delay(300);
}

void loop()
{
  unsigned int data[6];

  // Start I2C Transmission
  Wire.beginTransmission(Addr);
  // Select data register
  Wire.write(0x01);
  // Stop I2C Transmission
  Wire.endTransmission();

  // Request 6 bytes of data
  Wire.requestFrom(Addr, 6);

  // Read 6 bytes of data
  // xMag lsb, xMag msb, yMag lsb, y Mag msb, zMag lsb, zMag msb
  if(Wire.available() == 6)
  {
    data[0] = Wire.read();
    data[1] = Wire.read();
    data[2] = Wire.read();
    data[3] = Wire.read();
    data[4] = Wire.read();
    data[5] = Wire.read();
  }

  // Convert the data
  int xMag = ((data[1] * 256) + data[0]);
  int yMag = ((data[3] * 256) + data[2]);
  int zMag = ((data[5] * 256) + data[4]);

  // Output data to serial monitor
  Serial.print("Magnetic field in X Axis : ");
  Serial.println(xMag);
  Serial.print("Magnetic field in Y Axis : ");
  Serial.println(yMag);
  Serial.print("Magnetic field in Z Axis : ");
  Serial.println(zMag);
  delay(1000);
}
[/codesyntax]
Output
Open the serial monitor and you should see something like this
Magnetic field in X Axis : 31230
Magnetic field in Y Axis : 32261
Magnetic field in Z Axis : 17665
Magnetic field in X Axis : 30974
Magnetic field in Y Axis : 32517
Magnetic field in Z Axis : 13057
Magnetic field in X Axis : 31742
Magnetic field in Y Axis : 31237
Magnetic field in Z Axis : 18177
Magnetic field in X Axis : 31486
Magnetic field in Y Axis : 32005
Magnetic field in Z Axis : 18689
Links
GY-3110 MAG3110 Triple 3 Axis Magnetometer Breakout Electronic Compass Sensor Module For Arduino